How to Create a Custom GPT for the Chat GPT Store: Step by Step 2024

Does the phrase ‘create a custom GPT’ sounds far-fetched? It’s not. The recent release of the custom GPT store from OpenAI, has marked a significant milestone in artificial intelligence. Custom GPTs, tailored to specific needs and niches, are quickly changing how we interact with chatGPT. As we step into 2024, creating a custom GPT for the Chat GPT Store has opened the eyes of many creators. You can now customize and potentially monetize your own version of ChatGPT. This is on top of the many ways to make money with chatGPT already out there.
Key Takeaways
- Preparation Is Key: Define your GPT’s purpose. Name your customGPT wisely.
- Detail-Oriented: Provide clear instructions, and test thoroughly.
- Strategic Launch and Monetization: Understand OpenAI’s policies, publish effectively, and use the GPT Store’s features for monetization.
- Importance of Regular Updates: Keep your GPT relevant and efficient through continuous updates and user feedback.

Understanding Custom GPTs
GPTs are advanced AI models designed to understand and generate human-like text. They’re capable of conversing, answering queries, and even performing specific tasks. The leap from standard GPTs to custom versions has been a game-changer, allowing for a more tailored experience that caters to diverse individual and business needs. Only a few short months ago, we received the ability to add custom instructions. Now the creators of ChatGPT, OpenAI, have built a store where users can customize their own version of chatGPT for business or public use.
The Rise of Customization in AI
The demand for personalized AI solutions has led to the development of the GPT Store, a platform where over 3 million custom GPTs have been created, with about 159,000 currently available for public use. These custom GPTs span various domains, including education, entertainment, and business, showcasing the versatility and adaptability of AI in today’s world.
As we delve into the realm of creating custom GPTs, it’s essential to understand the process, from conception to launch. This guide will walk you through each step, ensuring that by the end, you’ll be well-equipped to bring your custom GPT to life and make it a success in the Chat GPT Store.
Preparing to Build Your Custom GPT
Before diving into the creation of your custom GPT, it’s crucial to lay a solid foundation. This preparation phase involves understanding the prerequisites and defining the purpose of your GPT.
Requirements: ChatGPT Plus or Enterprise Account
To start building a custom GPT, you need access to the right tools. A subscription to ChatGPT Plus, which costs $20 per month, is the minimum requirement. If you are a medium to large sized organization, you may want to consider an Enterprise account for more advanced features and capabilities. As an individual creator, I am quite happy using ChatGPT Plus. The initial investment is a stepping stone to accessing the GPT Store and (hopefully!) its array of functionalities.
If you don’t already have chatGPT Plus it’s simple to upgrade. Click on the ChatGPT 3.5 button in the top left, or the “upgrade” button directly above your username in the bottom left corner.
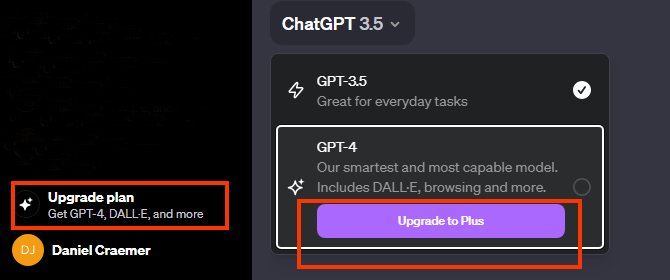
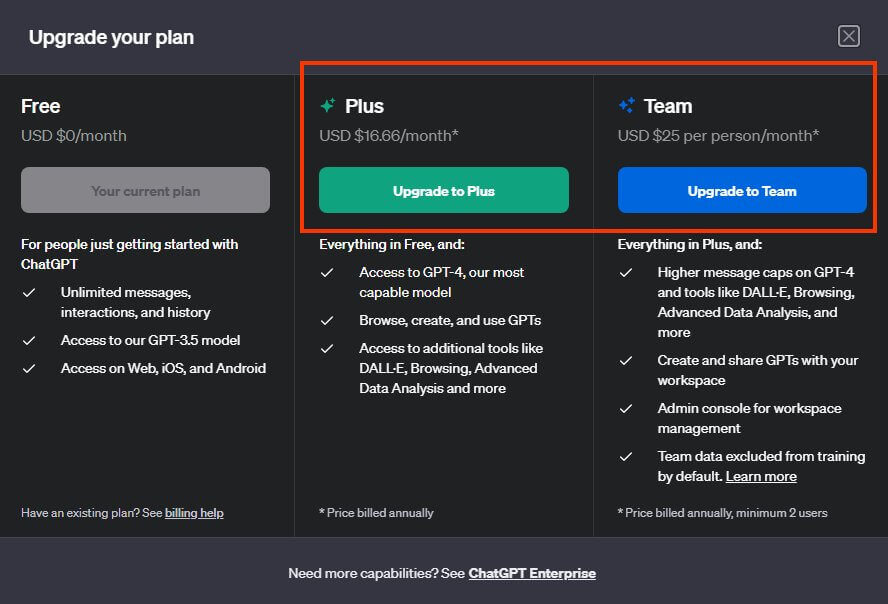
Once you have done that, you can choose between one of the upgraded plans. For ChatGPT Plus it’s $20 per month, or a serious savings of 40% ($16.66 per month) if billed annually.
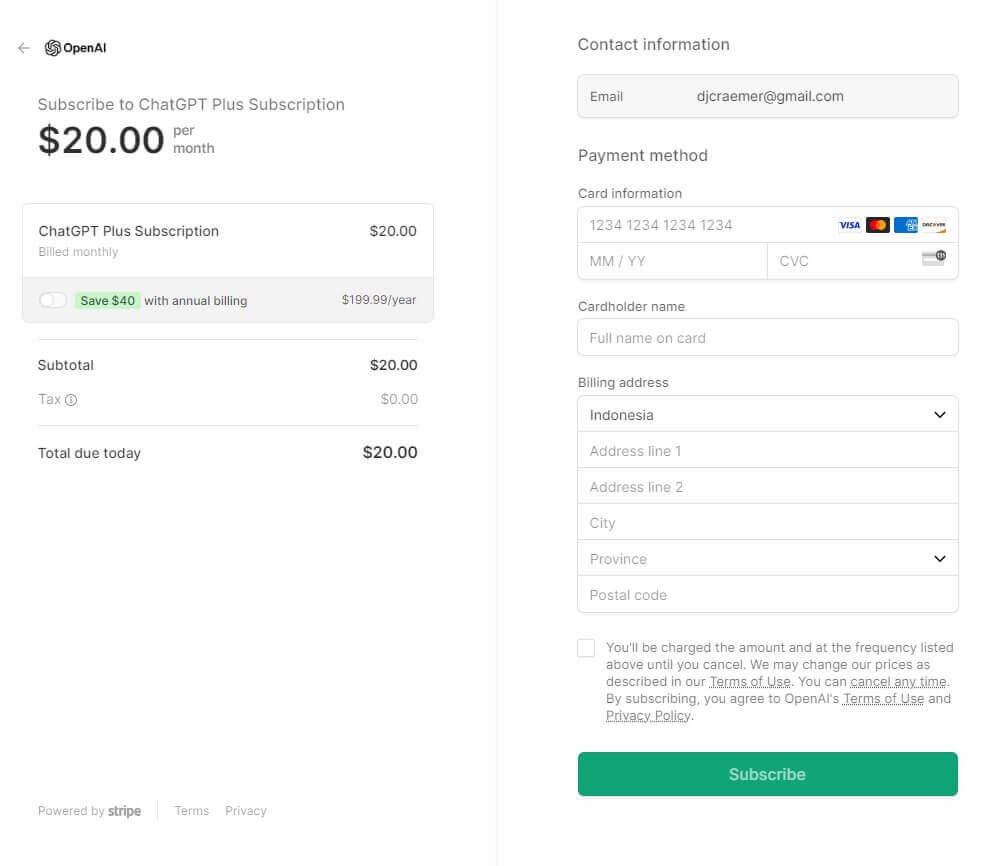
Next up you can put in your details, choose annually or monthly, and hit the subscribe button. You’re now the happy subscriber of a ChatGPT Plus account!
Defining Your GPT’s Purpose and Niche
As with anything, you need to pick a niche. With over 3 million custom GPTs created, finding a unique or underserved niche will be key. Whether it’s a GPT designed for educational purposes, entertainment, or specific industry needs, understanding what your GPT aims to achieve is critical.
Identifying Your Audience: Who will use your GPT? Tailoring your GPT to meet the specific needs and preferences of your target audience will make it more appealing and useful.
Innovative Solutions: Since the store is so new, you should not need to look hard to find gaps in the current market. However, consider this: Is there a demand for a particular type of GPT that hasn’t been met yet? For instance, a GPT specialized in a niche area of law or a language learning assistant for less commonly taught languages could fill a gap in the market. Look for an area that is currently unrepresented to have the highest chance of your customGPT getting highly ranked.
Aligning with Trends: As the customGPT store starts to grow in popularity, stay updated with the trends user behavior. Aligning your GPT with your target market’s needs to help give you a competitive edge.
In this preparation stage, your goal is to conceptualize a GPT that not only fulfills a specific need but also stands out in the GPT Store. With a clear purpose and understanding, you’re now ready to create a custom GPT.

The Building Process: Step by Step
Creating a custom GPT in this early stage of the store’s release will be a lot of trial and error. Here’s a step-by-step guide to help you streamline the building process. Use each point as a little checklist for yourself.
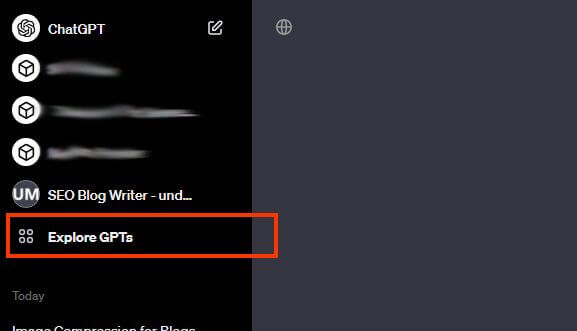
After you have upgraded to a chatGPT Plus or Enterprise subscription you will see a new option in the top left corner to “exploreGPTs.” Click on it and go into the chatGPT Store.
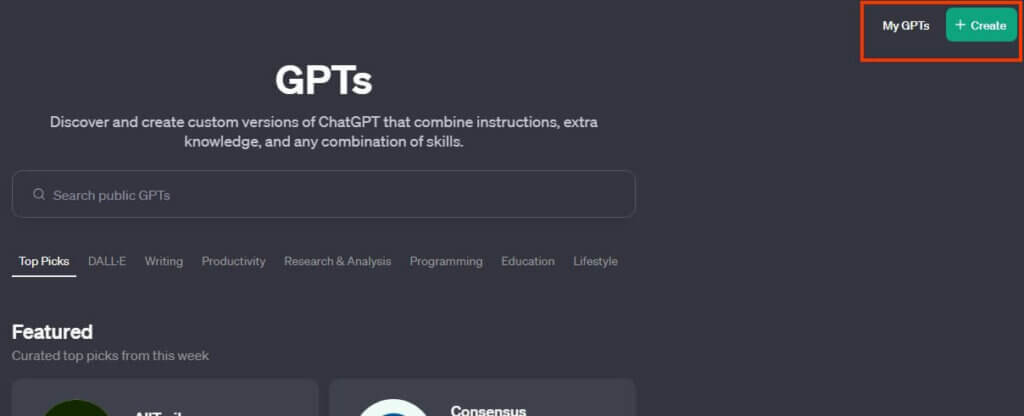
With the store up, browse around and see the different categories and customGPTs. Get familiar with the space. Once you are, click on the button in the top right to create a custom GPT.
Here is an image breakdown of all the sections where you can input information when creating your customGPT.
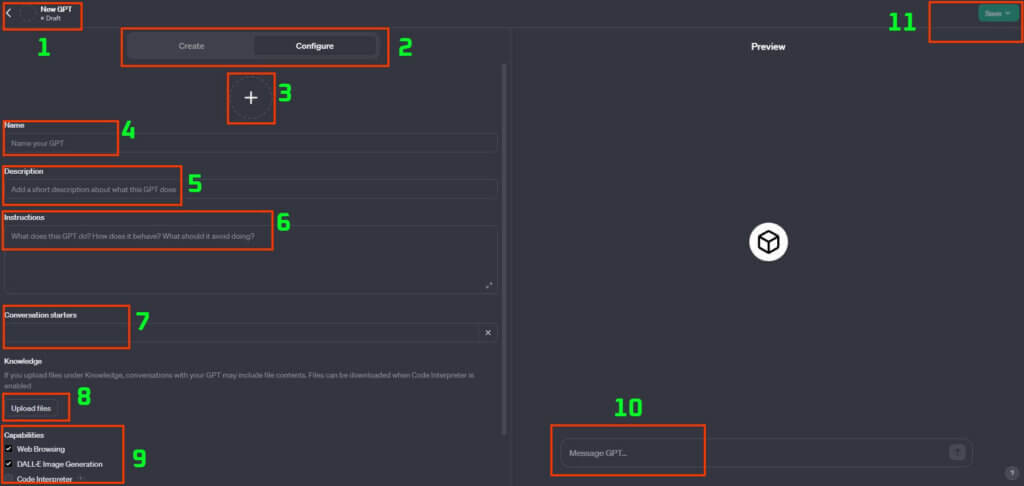
CustomGPT creation screen breakdown:
- Back Button: Takes you out of the creation screen.
- Create/Configure Toggle: Add instructions, or create a chat using the customGPT
- Logo Image: Click on the + button and add your logo
- CustomGPT Name: The name of your custom GPT
- Description: A description of what your GPT is about. It appears under the name of your GPT.
- Instructions: This is the heart of your CustomGPT. Input all of your instructions here on how you want your chat to function. I suggest using google docs to prepare and iterate.
- Conversation Starters: These are the prompts that will appear above the input chat box when a user first starts a new chat. They disappear after the first message of every chat.
- Upload Files: Here you can upload information that your customGPT will have access to. According to the OpenAI documentation, anything uploaded here may appear in your chat. So ensure you are not uploading anything confidential.
- Capabilities: Here you can choose if you want your customGPT to search the web, create images, or code.
- Chat Input Box: This is where you chat to your customGPT to test it. Every time you change something on the left side, it is considered a new chat and will start over from the beginning. This chat does not get saved anywhere I have been able to find, so do not use it for actual work! It is only for testing.
- Save Button: Here you can choose to save your GPT. The options are Private, Anyone with the link, and Public (this option is for adding it to the OpenAI GPT Store).
Naming Your GPT
The name of your GPT is its first identifier, a crucial aspect that captures its essence. A compelling, descriptive, and memorable name will make your GPT stand out. Consider a name that reflects its function or the unique value it offers. For instance, “LegalEagle GPT” could be a great name for a legal advice GPT. Go with your company name if you already have one for consistent branding.

Providing Instructions and Examples
One of the most critical steps in creating your GPT is defining clear, detailed instructions. These instructions guide your GPT in understanding its purpose and how it should interact with users. Be specific about the GPT’s tone, style, and the type of responses it should generate. Adding examples can significantly improve the accuracy and relevance of your GPT’s responses.
Crafting Context: Define the context in which your GPT will operate. For example, if you’re creating a GPT for travel advice, include scenarios and question types it’s likely to encounter.
User Interaction: Outline how your GPT should interact with users. Should it be formal or informal? Does it need to have a sense of humor, or should it be straightforward?
Tips for creating your instructions:
- Be specific and concise: If you write a long wordy sentence, ask chatGPT to rewrite it to be more concise.
- Separate instructions into steps: I found that creating clearly defined steps, the chat was able to follow them more clearly.
- Ask for user confirmation: A very good way to ensure your customGPT runs as intended, is to have it confirmed with the user after every step. This ensures the instructions were followed, and the user is happy with the result before moving on.
- Use Uppercase for Emphasis: DO NOT WRITE CODE BLOCKS IN YOUR OUTPUT! Got your attention didn’t it? It does the same for chatGPT.
- Provide Sections for Each Prompt: If you have a conversation started called “How To Use AwesomeGPT”, Create a section in your instructions such as “CONVERSATION STARTER: ‘How To Use AwesomeGPT’- Respond to this conversation starter by explaining to the user what you are designed to do, and how they can best use you.
Testing and Refining Your GPT
Before launching, thoroughly test your GPT. You can get very different results from chatGPT from a minor adjustment to your instructions. So be sure to test every time you make an edit. Engage with it in different scenarios to ensure it responds accurately and effectively. Identify any gaps in its understanding or areas where the responses could be improved. Refining your GPT based on these tests is crucial for creating a reliable customGPT.
Feedback Loop: Involve potential users in the testing phase. If you already have a social media following, or media outlet, consider asking for user testing using the direct link. Their feedback can provide valuable insights into user experience and functionality.
Iterative Improvement: Use the feedback to make iterative improvements. The goal is to refine your GPT until it aligns perfectly with its intended purpose and audience.
After completing these simple steps, you now have a fully functioning custom GPT, ready to make an impact in the GPT Store. The process of building, testing, and refining is iterative and requires patience and attention to detail. But the result – a GPT tailored to your vision – is well worth the effort.
Launching and Monetizing Your GPT
After diligently crafting your custom GPT, it’s time to launch it to the world and wait for OpenAI to provide a means for monetization.
Publishing on the GPT Store
Launching your GPT involves a few key steps:
- Final Checks: Ensure your GPT is thoroughly tested and refined. It should be free of bugs and aligned with its intended purpose.
- Understanding OpenAI’s Policies: Familiarize yourself with OpenAI’s usage policies and brand guidelines. Adhering to these guidelines is crucial so your customGPT does not get removed for a policy breach!
- Publishing: Navigate to the GPT Store’s publishing section. If it’s a new model, click “Publish”; for updates to an existing model, select “Update”. Upon confirmation, you’ll receive a shareable link to your GPT.
- Setting Public Visibility: Adjust your GPT’s settings to make it public. This step is essential for your GPT to appear in the GPT Store and be accessible to users.
Revenue-Sharing and Marketing Strategies
Monetizing your GPT can be achieved through a strategic approach:
- Set a Price: Decide on a pricing model for your GPT. This could be a one-time fee, a subscription model, or pay-per-use, depending on your customGPT’s functionality and target audience.
- Leverage the Leaderboard: The GPT Store features a leaderboard ranking models based on popularity and user ratings. Aim to get your GPT on this leaderboard for increased visibility and potential earnings.
- Marketing Your GPT: Employ marketing strategies to promote your GPT. This could include social media marketing, content marketing, or collaborations with influencers in your niche.
- Regular Updates: Keep your GPT relevant and appealing by regularly updating it based on user feedback and changing trends.
By following these steps, you can launch and monetize your custom GPT effectively. Your customGPT is now a profitable venture in the Chat GPT Store. Pat yourself on the back.
Maintaining and Updating Your GPT
The launch of your custom GPT in the Chat GPT Store is just the beginning. Ongoing maintenance and updates are key to ensuring its continued success and relevance.
Regular Updates and User Feedback
Staying Relevant: Technology and user preferences are constantly evolving. Regular updates keep your customGPT in line. With the ChatGPT Store newly opened and ChatGPT 5 on the horizon it is important to stay updated on the latest trends. Keep an eye on new updates and adjust your instructions as needed.
Incorporating Feedback: User feedback is invaluable. It provides insights into how your GPT is being used and areas where it can be improved. Actively seek out feedback and use it to enhance your GPT’s performance and user experience.
Ensuring Privacy and Ethical Use
Adhering to Privacy Standards: It should already be built into the ChatGPT model, however, you should still ensure that your GPT complies with privacy laws and standards. Users should feel confident that their interactions with your GPT are secure and private.
Ethical Considerations: Regularly assess your GPT for ethical considerations, especially if it deals with sensitive topics. It’s important to ensure that your GPT’s responses are unbiased and respectful. Make sure you are not in violation of any OpenAI policy’s when creating your customGPT!
Monitoring Performance: Keep an eye on your GPT’s performance metrics. This includes usage statistics, user ratings, and other relevant data that can inform your update strategy.
By committing to regular maintenance and updates, you ensure that your GPT remains a valuable and trusted resource in the Chat GPT Store. This not only enhances user satisfaction but also solidifies your reputation as a creator of high-quality, responsive AI solutions.
Conclusion
Creating a custom GPT for the Chat GPT Store represents a unique intersection of creativity, technology, and entrepreneurship. As we’ve explored in this guide, the journey from conceptualizing to launching a custom GPT is both challenging and rewarding. By understanding the steps involved, from preparing and building to launching and maintaining your GPT, you’re well-equipped to make your mark in the world of AI.
The OpenAI GPT Store is more than just a platform; it’s a gateway to innovation and personalization in AI. Whether you’re a developer, a business professional, or an AI enthusiast, the opportunity to create a GPT that resonates with your vision and meets the needs of a specific audience is immense. As the field of AI continues to evolve, the role of custom GPTs will undoubtedly expand, offering ever-more sophisticated and tailored experiences.
Remember, the success of your custom GPT hinges not just on its initial launch but on your commitment to its ongoing development. Regular updates, responsiveness to user feedback, and adherence to ethical standards are key to maintaining its relevance and effectiveness.
By following these guidelines, you’re well on your way to creating a custom GPT that stands out in the Chat GPT Store. Embrace the challenge, and let your creativity lead the way in the exciting new ear of AI.
Frequently Asked Questions (FAQs)
Do I need coding skills to create a custom GPT?
No, you don’t need advanced coding skills to create a custom GPT. The GPT Store has made the process user-friendly, allowing creators to build GPTs with simplified interfaces and clear instructions.
How much does it cost to create and launch a custom GPT?
The initial cost involves subscribing to ChatGPT Plus or Enterprise, which starts at around $20 per month. Additional costs may arise depending on the complexity of your GPT and any additional resources you might use.
Can I monetize my custom GPT?
Yes, you can monetize your custom GPT through the GPT Store’s revenue-sharing model. You can set a price for usage, and earnings will depend on the popularity and utility of your GPT.
How can I ensure my custom GPT stays relevant?
Regular updates and incorporating user feedback are crucial. Stay informed about the latest trends and continuously refine your GPT to meet evolving user needs.
What are the key ethical considerations when creating a custom GPT?
Ensure your GPT respects user privacy and adheres to ethical guidelines. This includes unbiased and respectful responses, especially when dealing with sensitive topics.